Lab 02 - Introduction to Python
Introduction to Python programming

1. Activity Identity
| Activity title | Introduction to Robotics |
|---|---|
| Topic | Python |
| Authors | Institute of Robotics and Machine Intelligence Dominik Belter, Jakub Chudziński, Marcin Czajka, Kamil Młodzikowski |
| Target learners | Bachelor |
| Estimated duration | 1.5 hours |
| Difficulty level | Beginner |
| FOSSBot environment | FOSSBot:v2 |
| Licence | CC BY 4.0 |
2. Learning Objectives and Competences
| ID | Learning outcome | Related competences | Assessment evidence |
|---|---|---|---|
| LO1 | Students will be able to write, debug, and execute basic Python scripts using variables, loops, conditionals, and functions. | Computational thinking / Programming | Completed scripts |
| LO2 | Students will be able to set up and manage isolated Python virtual environments (venv). | Programming / Software development | Setup and management of virtual environments |
| LO3 | Students will be able to perform basic data manipulation and file I/O operations using standard Python libraries and NumPy. | Data handling / Computational thinking | Source code and output files |
| LO4 | Students will be able to apply Python scripting to issue basic movement commands to the FOSSBot | Robot programming | Robot control script in Python, optional video |
3. Prerequisites
Basic knowledge of programming concepts (variables, loops, functions)
Basic knowledge of the command line interface (terminal) and file management
Safety rules for powered electronics
Ability to capture evidence: screenshots, logs or observation tables
4. Required Material and Setup
| Category | Item | Version / Quantity | Notes |
|---|---|---|---|
| Hardware | Workstation | 1 per group | A workstation with Ubuntu installed |
| Hardware | FOSSBot:v2 kit | 1 per group | Ensure the battery is charged |
| Software | Python & Virtual Env | Version recommended for your OS system | Check installation instructions in Step 0 |
| Software | IDE (e.g., VS Code, PyCharm) | Latest version | Optional, but recommended for easier coding |
5. Safety, Ethics and Accessibility Notes
Battery and wiring safety must be checked before powering the robot.
Make sure there is enough space around the robot to move safely, and that there are no obstacles that could cause damage to the robot or the environment.
Visual Accessibility: IDEs like VS Code and PyCharm support high-contrast themes and font scaling. Students are encouraged to adjust the terminal and editor font sizes using Ctrl + ‘+’ for better readability if needed.
6. Scenario and Problem Statement
Python is one of the most popular programming languages in AI, robotics, and many other fields. In this lab, you will learn the basics of Python programming and how to use it to control a robot. These instructions will cover Python syntax, data structures, and basic programming concepts. However, if you want to learn more about Python, there are many online courses and tutorials (e.g., Harvard CS50’s Introduction to Python or w3schools Python tutorial) that can help you deepen your knowledge.
7. Lab Workflow
| Phase | Student action | Expected output | Time |
|---|---|---|---|
| 1. Prepare the workspace | Initialize environment | Ready-to-run folder | [5 min] |
| 2. Read about the basics of Python | Read about the basics of Python | Basic understanding | [10 min] |
| 3. Basic scripts implementation | Write code | Completed scripts | [45 min] |
| 4. Python for robot control | Write Python scripts to control the robot | Completed scripts | [20 min] |
| 5. Reflect | Answer synthesis questions | Short analysis | [10 min] |
8. Step-by-Step Instructions
Step 0 - Initial environment preparation [skip if using the workstations in the laboratory]
- Install Python using the following commands in terminal:
Update the package list:
sudo apt updateInstall the recommended Python3 version for your operating system, with pip (Python package manager) and venv (virtual environment) support:
sudo apt install python3 python3-pip python3-venvYou can check the installed Python version with:
python3 --versionInstall an IDE of your choice (e.g., Visual Studio Code or PyCharm) and set it up for Python development.
- for Visual Studio Code, you can use the following command:
sudo snap install --classic codeand then install the Python extension from the marketplace. To open the current folder in VS Code, use:
bash code .- for PyCharm, you can use the following command:
sudo snap install pycharm-community --classicThen, open PyCharm and create a new project, selecting the Python interpreter you installed in step 1.
Step 1 - Environment preparation
- In case previous students did not remove the directory related to this lab, you should remove it:
rm -rf fossbot-python-lab- Create a new directory for this project and navigate into it:
mkdir fossbot-python-lab
cd fossbot-python-lab- Create a new Python virtual environment for this project:
python3 -m venv fossbot-env- Activate the virtual environment (this ensures that any Python packages you install will be isolated to this project):
source fossbot-env/bin/activateExpected result:
- A new directory named
fossbot-python-labis created and you are inside it. - A new virtual environment named
fossbot-envis created and activated. - Your terminal prompt should now indicate that you are in the
fossbot-envvirtual environment (e.g., it may show(fossbot-env)at the beginning of the prompt).
Step 2 - Basics of Python programming
Below is basic information about Python syntax and programming concepts. Please read through the following section. Because Python is an interpreted (scripting) language, the code is executed line by line and is not compiled beforehand, unlike in C++ or Java.
- Indentation: Python uses indentation to define code blocks. For example, a function definition looks like this:
def my_function():
    print("Hello, World!")
the code inside the function is indented, and this indicates that it belongs to the function.
Note: In Python, it is important to use consistent indentation (e.g., 4 spaces) to avoid syntax errors.
⚠️ Examples of wrong indentation:
# No indentation - this will cause a syntax error
def my_function():
print("Hello, World!")
# Inconsistent indentation - this will also cause a syntax error
def my_function():
print("Hello, World!")
print("This line has different indentation")- Variables and data types: In Python, you can store values in variables. Because Python is dynamically typed, you don’t need to declare the type of a variable (opposite to statically typed languages like C++ or Java). For example:
x = 10             # An integer
y = 2.718          # A float
name = "FOSSBot"   # A string
is_a_robot = True  # A boolean
Also you can overwrite the value of a variable with a different type:
x = 10                 # x is an integer
x = "Hello, FOSSBot!"  # x is now a string
Here are some basic algebraic operations you can perform:
a = 5
b = 3
sum_result = a + b       # Addition (8)
diff_result = a - b      # Subtraction (2)
prod_result = a * b      # Multiplication (15)
quot_result = a / b      # Division (1.666...)
mod_result = a % b       # Modulo (2)
pow_result = a ** b      # Exponentiation (125)
div_result = a // b      # Floor division (1)
You can also perform operations using variables of different types:
x = 10                 # x is an integer
y = 2.718              # y is a float
result = x * y # result is a float (27.18)- Data structures: To store multiple values, you can use data structures like lists, tuples, and dictionaries:
# A list is an ordered collection of items
my_list = [1, 2, 3, 4, 5]

# A tuple is an ordered, immutable collection of items
# (you cannot change the values in a tuple after it is created)
my_tuple = (1, 2, 3, 4, 5)

# A dictionary is a collection of key-value pairs
my_dict = {"name": "FOSSBot", "type": "robot", "number_of_wheels": 2}
To access the values in the abovementioned data structures, you can use indexing (for lists and tuples) or keys (for dictionaries):
print(my_list[0])       # Output: 1
print(my_tuple[1])      # Output: 2
print(my_dict["name"])  # Output: FOSSBot
To add new items to a list, you can use the append()
method:
my_list.append(6) # my_list is now [1, 2, 3, 4, 5, 6]And to add a new key-value pair to a dictionary, you can simply assign a value to a new key:
my_dict["color"] = "blue"
# my_dict is now:
# {"name": "FOSSBot", "type": "robot", "number_of_wheels": 2, "color": "blue"}- Conditional statements: You can use
if,elif, andelsestatements to perform different actions:
distance_to_target = 10

if distance_to_target > 50:
    print("The robot is far away. Get closer!")
elif distance_to_target < 5:
    print("The robot is close. Stop!")
else:
    print("The robot is at a moderate distance. Keep going!")
You can also use logical operators (and,
or, not) to combine conditions:
is_obstacle_detected = True
is_battery_low = False

if not is_obstacle_detected and not is_battery_low:
    print("The robot can move forward.")
elif is_battery_low:
    print("The robot should recharge.")
else:
print("The robot should avoid the obstacle.")- Loops: You can use
forandwhileloops to repeat actions:
# A while loop is executed as long as a condition is true
i = 0
while i < 5:
    print(f"Counter: {i}")
    i += 1  # This is equivalent to i = i + 1
# A for loop iterates over some sequence (like a list or a range of numbers)
for i in range(5): # This will iterate over the numbers 0, 1, 2, 3, 4
print(f"Counter: {i}")
fossbot_colors = ["blue", "red", "green"]
for color in fossbot_colors: # This will iterate over the items in the list
print(f"Color: {color}")Note: The
range()function generates a sequence of numbers. It can take one, two, or three arguments:range(stop),range(start, stop), orrange(start, stop, step). For example,range(5)generates the numbers 0 to 4, whilerange(1, 6)generates the numbers 1 to 5, andrange(1, 10, 3)generates the numbers 1, 4, 7.
- Functions: If you have a part of code that you want to reuse multiple times, you can define a function, so it can be called whenever needed:
def greet(name):
    print(f"Hello, {name}!")

greet("FOSSBot") # Output: Hello, FOSSBot!Note: The
fbefore the string in theprint()function allows you to use f-strings, which are a convenient way to format strings with variables. But you can also concatenate strings using the+operator:
def greet(name):
    print("Hello, " + name + "!")

greet("FOSSBot")  # Output: Hello, FOSSBot!
You can also return values from a function using the
return statement:
def add(a, b):
    return a + b

result = add(5, 3)  # result is 8
Moreover, you can set default values for function parameters. This means that if you don’t provide a value for that parameter, it will use the default value:
def greet(name, number_of_greetings=1):
    for i in range(number_of_greetings):
        print(f"Hello, {name}!")

greet("FOSSBot")
# Output: Hello, FOSSBot!

greet("FOSSBot", 3)
# Output:
# Hello, FOSSBot!
# Hello, FOSSBot!
# Hello, FOSSBot!Note: You can also set the variable types in the function definition, which can help with code readability and debugging, but is optional in Python:
def greet(name: str, number_of_greetings: int = 1) -> None:
    for i in range(number_of_greetings):
        print(f"Hello, {name}!")
The
-> Noneindicates that this function does not return any value. If the function were to return a value, you would replaceNonewith the type of the returned value (e.g.,-> strif it returns a string).
- Saving and loading data from files: You can use the
built-in
open()function to read from and write to files:
# Writing to a file
with open("output.txt", "w") as file:
    file.write("Hello, FOSSBot!\n")

# If you want to write multiple lines, you can use a list of strings and the writelines() method:
lines = ["Line 1\n", "Line 2\n", "Line 3\n"]
with open("output.txt", "w") as file:
    file.writelines(lines)

#If you don't want to overwrite the existing content of the file, you can open it in append mode:
with open("output.txt", "a") as file:
file.write("This line will be added to the end of the file.\n")Note: The
\nat the end of the string indicates a new line.
# Reading from a file
with open("output.txt", "r") as file:
data_from_file = file.read()- Importing libraries: To use additional functionalities, you can import libraries. There are many libraries available for Python that can help you with various tasks, such as machine learning, robot control and more. For example, to use the popular NumPy library that provides support for multidimensional arrays and mathematical functions, you can install it using pip and then import it in your code:
pip install numpyIf you need a specific version of the library, you can install it like this:
pip install numpy==1.21.0Then, in your Python code, you can import the library:
import numpy

some_array = numpy.array([1, 2, 3, 4, 5])
mean_value = numpy.mean(some_array)
Or you can import it with an alias for easier use:
import numpy as np

some_array = np.array([1, 2, 3, 4, 5])
mean_value = np.mean(some_array)
It is also possible to import only specific functions or classes from a library:
from numpy import array, mean

some_array = array([1, 2, 3, 4, 5])
mean_value = mean(some_array)- Classes and objects: Python is an object-oriented
language, which means that you can create your own data types and
instances of those data types. You can define a class using the
classkeyword, and then create objects (instances) of that class:
class Robot:
    # __init__ is a special method
    # that is called when an object is created
    def __init__(self, name, number_of_wheels):
        # To define attributes of the class, you can use the self keyword
        self.name = name
        self.number_of_wheels = number_of_wheels

    # When defining methods of the class,
    # you also need to use the self keyword as the first parameter
    def greet(self):
        print(f"Hello, I am {self.name} and I have {self.number_of_wheels} wheels.")

    # You can also define methods that take additional parameters
    def move(self, distance):
        print(f"{self.name} is moving {distance} meters.")

my_robot = Robot("FOSSBot", 2)
my_robot.greet()  # Output: Hello, I am FOSSBot and I have 2 wheels.
my_robot.move(10)  # Output: FOSSBot is moving 10 meters.
Step 3 - Tasks: Write scripts
In this part, you will write some basic Python scripts to practice
the concepts you have learned. Inside the
fossbot-python-lab directory, create a new file for each
task (e.g., task1.py, task2.py) and open them
in your IDE. Use the following code snippet as a template for your
scripts:
def main():
    # Your code here
    pass  # This is a placeholder that does nothing. Remove it when you add your code.

# This ensures that the main() function is called when you run the script
if __name__ == "__main__":
main()- Generate an array of 100 random integers between 1 and 100. Save the
array to a text file, with one item per line. You can use the
randommodule for this and therandrange()function. Check the documentation for more information https://docs.python.org/3/library/random.html. Then, calculate and print the mean of the numbers in the array. Do this using two approaches:
- Using a for loop and dividing the sum by the number of elements (you
can use the
len()method to get the number of elements in the array). - Using the
np.mean()function from the NumPy library.
Print the results in the console.
Load the text file from task 1. Find the most common number in the file and how many times it appears. Print the result in the console.
Generate an array of integers from 1 to 100 using the
range()function. Do the following operations on the array:
- if the number is divisible by 3, replace it with the string “Bot”,
- if the number is divisible by 4, replace it with the string “FOSS”,
- if the number is divisible by both 3 and 4, replace it with the string “FOSSBot”.
Print the resulting array. This task is based on the classic FizzBuzz problem (e.g., https://leetcode.com/problems/fizz-buzz/description/)
Prepare a script that will take two inputs from the user (use the
input()function - documentation) - a string to encrypt and a shift value. Add validation to ensure the shift value is an integer. Write a function that will implement the Caesar cipher to encrypt the input string. Read more about the Caesar cipher here: https://en.wikipedia.org/wiki/Caesar_cipher.Prepare a script that will take an integer input from the user. Then, write a function that will calculate the Digital Root of the input number. The Digital Root is the recursive sum of all the digits in a number until it becomes a single digit. For example, the Digital Root of 23 is 5 (2 + 3 = 5), and the Digital Root of 999 is 9 (9 + 9 + 9 = 27, then 2 + 7 = 9). Read more about Digital Root here: https://en.wikipedia.org/wiki/Digital_root. Use a generator to implement the solution with the
yieldkeyword to generate each digit (more about generators: https://wiki.python.org/moin/Generators).
Expected result: You should have 5 Python scripts that implement the tasks described above.
Step 4 - How to use Python for robot control
- Ask the instructor how to connect to the robot (Wi-Fi name and password + IP address). Then, connect to the Wi-Fi network and check if the robot is reachable by pinging its IP address.
ping <robot_ip_address>- Write code to make the robot move.
Use the following code snippet, and implement the logic to move the
robot forward, backward, and rotate left and right. You should use the
_set_motor() method to set the duty cycle for each motor,
so take a look at it’s implementation. The move_forward(),
move_backward(), turn_left(), and
turn_right() methods should be implemented to control the
robot’s movement.:
#!/usr/bin/env python3

# Usage: python3 test_robot_net.py [ROBOT_HOST]
# ROBOT_HOST is the robot's IP address or hostname (default: fossbotrpi1.local)

# Imports
import json
import socket
import struct
import sys
import threading
import time

# Network configuration
COMMAND_PORT = 5006
SERVICE_PORT = 5007
COMMAND_MAGIC = 0x46424331
CMD_DIRECT = 1
CMD_STOP = 2

# How often the motor command is sent to the robot (Hz)
# The robot stops the motors if no command arrives within 0.5 s
SEND_RATE = 20

# Set the duty cycle for PWM (0-100)
DUTY_CYCLE = 50

class Robot:
    def __init__(self, host):
        self.host = host
        self.duty = {"left": 0.0, "right": 0.0}
        self.lock = threading.RLock()
        # Commands are numbered, the robot ignores commands older than the last one
        self.seq = int(time.time() * 1000) & 0x7FFFFFFF

        # Connect to the robot
        # TCP is used for requests (enable motors, status), UDP for motor commands
        self.srv = socket.create_connection((host, SERVICE_PORT), timeout=3)
        self.srv_file = self.srv.makefile("r")
        self.udp = socket.socket(socket.AF_INET, socket.SOCK_DGRAM)
        self.addr = (socket.gethostbyname(host), COMMAND_PORT)

        if self._request(op="status").get("estop"):
            raise RuntimeError("Robot is in emergency stop mode")
        # Enable the motors
        self._request(op="enable_motors", enable=True)

        # Keep sending the current motor command in the background
        self.running = True
        self.sender = threading.Thread(target=self._sender_loop, daemon=True)
        self.sender.start()
        print(f"Connected to {host}. Motors are enabled.")

    def _request(self, **request):
        self.srv.sendall((json.dumps(request) + "\n").encode())
        reply = json.loads(self.srv_file.readline())
        if not reply.get("ok"):
            raise RuntimeError(f"Request {request['op']} failed: {reply}")
        return reply

    def _send(self, cmd_type):
        with self.lock:
            self.seq += 1
            frame = struct.pack("<IIBff", COMMAND_MAGIC, self.seq & 0xFFFFFFFF,
                                cmd_type, self.duty["left"], self.duty["right"])
            self.udp.sendto(frame, self.addr)

    def _sender_loop(self):
        while self.running:
            self._send(CMD_DIRECT)
            time.sleep(1.0 / SEND_RATE)

    def _set_motor(self, motor, direction, duty):
        # motor: "left" or "right"
        # direction: 1 = forward, -1 = backward, 0 = stop
        # duty: speed of the motor (0-100)
        if motor not in self.duty:
            raise ValueError("Motor must be 'left' or 'right'")
        if direction not in (-1, 0, 1):
            raise ValueError("Direction must be 1, -1 or 0")
        duty = max(0, min(100, duty))
        with self.lock:
            self.duty[motor] = direction * duty / 100.0

    def move_forward(self, duty=50):
        # The lock makes sure both motors are changed before the next command is sent
        with self.lock:
            # Remove the NotImplementedError and implement the logic to move the robot forward
            raise NotImplementedError("This method should be implemented to move the robot forward.")

    def move_backward(self, duty=50):
        # The lock makes sure both motors are changed before the next command is sent
        with self.lock:
            # Remove the NotImplementedError and implement the logic to move the robot backward
            raise NotImplementedError("This method should be implemented to move the robot backward.")

    def turn_left(self, duty=50):
        # The lock makes sure both motors are changed before the next command is sent
        with self.lock:
            # Remove the NotImplementedError and implement the logic to turn the robot left
            raise NotImplementedError("This method should be implemented to turn the robot left.")

    def turn_right(self, duty=50):
        # The lock makes sure both motors are changed before the next command is sent
        with self.lock:
            # Remove the NotImplementedError and implement the logic to turn the robot right
            raise NotImplementedError("This method should be implemented to turn the robot right.")

    def stop(self):
        with self.lock:
            self._set_motor("left", 0, 0)
            self._set_motor("right", 0, 0)
            self._send(CMD_STOP)

    def cleanup(self):
        # Stop the robot, disable the motors and close the connection
        self.stop()
        self.running = False
        self.sender.join(timeout=1)
        try:
            self._request(op="enable_motors", enable=False)
        except (OSError, ValueError, RuntimeError):
            pass
        self.srv.close()
        self.udp.close()
        print("Robot cleanup completed. Motors are disabled.")

if __name__ == "__main__":
    host = sys.argv[1] if len(sys.argv) > 1 else "fossbotrpi1.local"
    robot = None
    try:
        robot = Robot(host)

        # Move the robot forward for 2 seconds
        print("Moving forward...")
        robot.move_forward(duty=DUTY_CYCLE)
        time.sleep(2)
        robot.stop()

        # Move the robot backward for 2 seconds
        print("Moving backward...")
        robot.move_backward(duty=DUTY_CYCLE)
        time.sleep(2)
        robot.stop()

        # Rotate the robot left for 1 second
        print("Rotating left...")
        robot.turn_left(duty=DUTY_CYCLE)
        time.sleep(1)
        robot.stop()

        # Rotate the robot right for 1 second
        print("Rotating right...")
        robot.turn_right(duty=DUTY_CYCLE)
        time.sleep(1)
        robot.stop()

    finally:
        if robot is not None:
robot.cleanup()- Create another script to read data from the LiDAR sensor and print the minimum distance value. After connecting to the robot, the LiDAR sensor will stop for a few seconds and then start spinning and sending data. Each line of the data is a JSON object that contains an array of points, where each point is a pair of (angle, distance). The angle is in degrees and the distance is in millimeters. You should implement the logic to find the minimum distance and its corresponding angle.
Use the following code snippet:
#!/usr/bin/env python3

# Usage: python3 lidar_test_net.py [ROBOT_HOST]
# ROBOT_HOST is the robot's IP address or hostname (default: fossbotrpi1.local)

# Imports
import json
import socket
import sys

# Network configuration
LIDAR_PORT = 5008

# Starting the lidar on the robot takes a few seconds
TIMEOUT = 10

if __name__ == "__main__":
    host = sys.argv[1] if len(sys.argv) > 1 else "fossbotrpi1.local"

    # Connect to the robot, it starts the lidar and sends one full scan per line
    lidar = socket.create_connection((host, LIDAR_PORT), timeout=TIMEOUT)
    lidar_file = lidar.makefile("r")

    try:
        print(f"Connected to {host}. Starting scanning...")
        max_scans = 50
        i = 0

        for line in lidar_file:
            scan = json.loads(line)["pts"]
            print(f"Scan contains {len(scan)} measurements")

            # Each measurement in the scan is a pair of (angle, distance)
            # Angle is the angle of the measurement in degrees,
            # and Distance is the distance to the object in millimeters.
            min_distance = float("inf")
            min_distance_angle = None
            for angle, distance in scan:
                raise NotImplementedError("Implement the logic to find the minimum distance and its corresponding angle.")

            if min_distance_angle is None:
                print("No valid measurements in this scan.")
            else:
                print(f"Minimum distance in this scan: {min_distance:.1f} mm at angle {min_distance_angle:.1f} degrees")

            i += 1
            if i >= max_scans:
                break

    except KeyboardInterrupt:
        print("Stopping...")

    finally:
        # Closing the connection stops the lidar on the robot
        lidar_file.close()
        lidar.close()
Make a screenshot of the output of the script and include it in your submission.
- Copy the following code and run it. It will save the LiDAR data to a CSV file.
#!/usr/bin/env python3

# Usage: python3 test_read_lidar_net.py [ROBOT_HOST]
# ROBOT_HOST is the robot's IP address or hostname (default: fossbotrpi1.local)

import csv
import json
import socket
import sys
import traceback

# Network configuration
LIDAR_PORT = 5008

# Starting the lidar on the robot takes a few seconds
TIMEOUT = 25

def run(host):
    lidar = None

    try:
        # Connect to the robot, it starts the lidar and sends one full scan per line
        print(f"Connecting to lidar on {host}...")
        lidar = socket.create_connection((host, LIDAR_PORT), timeout=TIMEOUT)
        lidar_file = lidar.makefile("r")

        print("\nStarting scan...")
        print("Press Ctrl+C to stop.\n")

        with open('lidar_data.csv', mode='w', newline='') as csv_file:
            fieldnames = ['scan_num', 'angle', 'distance']
            writer = csv.DictWriter(csv_file, fieldnames=fieldnames)
            writer.writeheader()

            for scan_num, line in enumerate(lidar_file):
                # Each measurement in the scan is a pair of (angle, distance)
                scan = json.loads(line)["pts"]

                distances = [distance for angle, distance in scan]

                if distances:
                    min_dist = min(distances)
                    max_dist = max(distances)
                    avg_dist = sum(distances) / len(distances)
                else:
                    min_dist = max_dist = avg_dist = 0

                print("=" * 70)
                print(f"SCAN #{scan_num}")
                print(f"Points captured: {len(scan)}")
                print(f"Min distance:    {min_dist:.1f} mm")
                print(f"Max distance:    {max_dist:.1f} mm")
                print(f"Avg distance:    {avg_dist:.1f} mm")

                print("\nFirst 10 measurements:")
                for angle, distance in scan[:10]:
                    print(
                        f"  Angle={angle:7.2f}° "
                        f"Distance={distance:8.1f} mm"
                    )

                print()

                # Write scan data to CSV
                for angle, distance in scan:
                    writer.writerow({
                        'scan_num': scan_num,
                        'angle': angle,
                        'distance': distance
                    })

                # Stop after 50 rotations for testing
                if scan_num >= 49:
                    print("Test complete.")
                    break

    except KeyboardInterrupt:
        print("\nStopped by user.")

    except Exception:
        print("\nERROR:")
        traceback.print_exc()

    finally:
        if lidar is not None:
            # Close the connection to the LiDAR sensor
            lidar.close()
            print("Disconnected.")


if __name__ == "__main__":
    host = sys.argv[1] if len(sys.argv) > 1 else "fossbotrpi1.local"
    run(host)
Now, prepare a script that will read the csv file using the
pandas library, will calculate the x and
y coordinates of the points from the angle and distance
values using numpy and will plot the points using the
matplotlib library. You can install the libraries using
pip:
pip install pandas matplotlibBelow is a code snippet that you can use as a template for your script:
#!/usr/bin/env python3
import pandas as pd
from matplotlib import pyplot as plt
import numpy as np

if __name__ == "__main__":
    # Read the csv file into a pandas dataframe
    df = pd.read_csv('lidar_data.csv')

    # Print the first 5 rows of the dataframe
    print(df.head(5))

    # We select a specific scan number to visualize. You can change the value of `scan_id` to visualize different scans.
    scan_id = 5

    # Filter the dataframe to get only the rows corresponding to the selected scan number
    scan_data = df[df['scan_num'] == scan_id]

    ### Implement the logic to calculate the x and y coordinates of the points using the angle and distance values. Use numpy for calculations.
Tip: To calculate the
xandycoordinates from the angle and distance values, you can use the following formulas:x = distance * cos(angle)andy = distance * sin(angle). Make sure to convert the angle from degrees to radians before using the trigonometric functions. You can use thenumpy.radians()function for this conversion.
Tip: To create new columns in the pandas dataframe for the
xandycoordinates, you can use the following syntax:df['x'] = ...anddf['y'] = ....
Tip: To plot the points using matplotlib, you can use the
plt.scatter()function. You can also set the aspect ratio of the plot to be equal usingplt.axis('equal')to ensure that the x and y axes are scaled equally.
Save the script and run it. You should see a plot of the points
corresponding to the selected scan number. Save the plot as an image
file (e.g., scan_plot.png) and include it in your
submission.
Expected result: Scripts that control the robot (the
robot should move forward, backward, and rotate left and right), a
script that reads data from the LiDAR sensor and prints the minimum
distance value, a csv file with LiDAR data, and a script that reads the
csv file, calculates the x and y coordinates of the points, and plots
them. An example of the plot is available below. 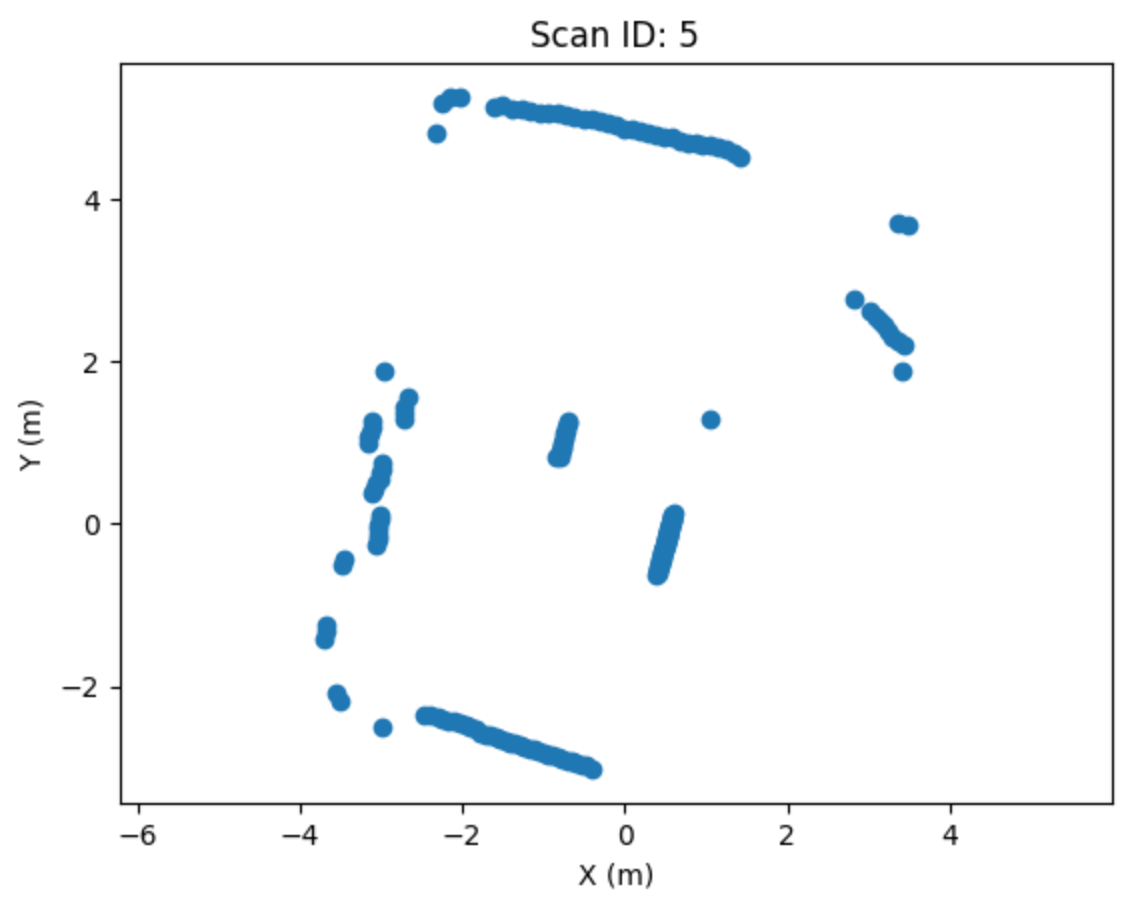
9. Analysis Questions
What are the advantages and disadvantages of using Python for robotics programming compared to other programming languages (e.g., C++ or languages for specific robots)?
In Step 3, you practiced saving and loading generated data using a text file. Why is file I/O (Input/Output) an important skill when working with robot sensors? Give a practical example of how you might use this during a robotics experiment.
What errors did you encounter while writing the scripts, and how did you debug them? Describe one specific error and what you learned from it.
10. Submission Requirements
Completed source code from Steps 3 and 4
Screenshot of the output of the LiDAR script
Plot of the LiDAR data from the csv file
Short answers to the analysis questions
Optional: video of the final behaviour of the robot
11. References and Open Licence
- Python3 documentation: https://docs.python.org/3/
- NumPy documentation: https://numpy.org/doc/
- Pandas documentation: https://pandas.pydata.org/docs/
- Matplotlib documentation: https://matplotlib.org/
- FOSSBotEduSim repository: https://github.com/LRMPUT/FOSSBotEduSim
- Harvard CS50’s Introduction to Python
- A tutorial on Python basics from PUT (in Polish): https://put-jug.github.io/lab-niodsr/Lab%2003%20-%20Python%20-%20podstawy.html
The Creative Commons Attribution 4.0 International (CC BY 4.0) license allows users to share, copy, distribute, and adapt the work, even for commercial purposes, as long as proper credit is given to the original creator.
EU funding disclaimer
Funded by the European Union. Views and opinions expressed are however those of the author(s) only and do not necessarily reflect those of the European Union or the European Education and Culture Executive Agency (EACEA). Neither the European Union nor EACEA can be held responsible for them.